Featured

Showing posts with label Articles. Show all posts

McDonald Goes Logo-Less


It took over 70 years and billions of customers served globally but McDonald’s can finally make ads with no copy or logos on it. Referred to as the ‘Unbranded’ campaign, the series of extreme close-ups was created by ad agency TBWA\Paris for use in outdoor ads throughout France.
Well done, McDonald’s and TBWA. You’ve not only successfully executed an unbranded ad campaign, but managed to make McDonald’s food appear somewhat edible. Although, we imagine being that close to the actual product would be quite horrifying.


Learn more »

How To Challenge Yourself Becoming A Better Photographer

Photography By: Matt Barnes

We all want things to be easy, stress free, and effortless. So much in fact we often overlook 

the benefits of a challenge. To continue improving our skills we have to regularly challenge


ourselves. Challenges may not always present themselves to us, we have to go looking for

them, create them. We must be constructively critical of our own work through self

examinations of our art to discover our weaknesses. Once we can pinpoint that, we know

what we have to work on to bring our photography to the next level. To get you started,

here are a few challenges that can help you down the path to improvement.

Photography By: Aaron Farely

Prime Lens


Try limiting yourself to using nothing but a prime lens for a set amount of

time, e.g one week, a month, etc…In doing so, you will be challenging your creativity and

your eye for composition. Since you will be shooting at a fixed focal length, the best way to

frame a shot may not always be very obvious. In many instances you will have to call on

some critical and creative thinking to get the composition just right. Creative thinking should 

become a part of our everyday process as photographers and this challenge is invaluable for 

instilling it in one’s system.


Photography By: Cristopher Martin

Revert To Film

We've mentioned this one in a previous post, but it’s such a good approach that it’s worth

bringing up again. One of the main benefits of shooting digital is it affords photographers to

take tons of images at a margin of the cost of film. Conversely, one of the benefits of shooting

with film is that it encourages photographers to save money by getting the shot right the

first time, thus eliminating the need to take 40 frames of the same subject “just to make

sure”. Fundamentally, taking a few backup shots of the same thing is a sound idea; however

,it let’s us get a little a lazy by giving us a safety net. Making a mistake with film hits us

where it hurts the most, our wallets. Not wanting to shell out tons of cash for those digital

camera inspired safety nets, shooting on film forces us to slow down, think about our

exposure settings, framing, etc so we don’t have to shoot through an entire roll of film just for


one salvageable image.


Photography By: Micheal Nagar

Self Assignments

Think about what your goals are as a photographer. If you were to start taking photographs 

as a means 
of making a living, what kind of photography would you choose? Product

photography, fashion 
photography, fine art, what style most appeals to you? Once you have

that decided give 
yourself a self assignment. Future product photographers could use any 


common household object and do a mock-up photo-shoot of it as though you were doing it for 

an advertisement in a magazine. Fashion photography minded people could enlist a 

fashionista friend and do a glamour shoot. Whatever it is that strikes your fancy, create an

assignment for yourself and conduct it as though you were being paid to complete it. 


This will encourage you to take pride in your work and ensure that you are always doing the

best you
are capable of doing.


Photography By: Micheal Nagar

Pay Attention To The Details

It’s easy to look at the big picture when we are out looking for things to photograph. First 

impressions are important, but don’t use them as a means of dismissing a subject altogether.

Spend a day out in the field photographing nothing but textures, angles, lines, and maybe 

even shadow play. In doing so, we are making ourselves look past the obvious by getting up 

close and personal with it’s composition, which more often than not goes by unnoticed. It will

teach you to be more thorough in evaluation a scene and before you know it, you’ll be finding 

photographic inspiration in everything around you.


Photography By: Christoph Martin

Challenges are, well, challenging, but they should not discourage us from continuing on our 

journey to become a better photographer. Regardless of your skill level, look at challenges as 

a means to better yourself and to better your art. Recognize what is hard for you and keep 

doing it over and over until it becomes second nature. Don’t let your weaknesses frustrate 

you, put them to work instead. Use them as an excuse to pick up your camera and go out 

shooting.


See Reference
Learn more »

Make Your Photo Scrapbook


In teaming up with Canon USA, we knew we wanted to talk about scrapbooking. A polarizing subject, to be sure, but one that's pretty close to my heart. I started my first scrapbooks nearly ten years ago and through the years I've heard many (MANY) recite a mile long list of "why-scrapbooking-is-not-for-me". Reasons like "I don't have time", "I would never be able to catch up", "It's too expensive", "It's a grandma craft" and (my personal favorite) "I'm not artistic". Excuses, excuses...
I used to laugh at all these excuses. Then one day, I became the excuse maker. I became the lady who didn't print any photos for two years. Then one day I had that "Wait, what?" moment. I realized even though I take photos every single day, I had very little to show for it in our home. Everything was stored digitally, which is better than nothing—sure. But suddenly, I wanted to print out ALL my photos and make a dozen scrapbooks. I was so determined, so hyped up and so clueless as to where to begin. 
So I just started. I bought some supplies, not a ton, but some stuff that seemed fun. I started organizing and printing photos, and I was shocked by how many really special, wonderful photos were hidden on those hard drives. It was such a good moment to just start doing something I had been putting off for so long.

For 4x6 photos we love using our Canon SELPHY CP900 printer with Photo Paper Glossy. It's tiny, convenient and great quality! Printing photos in bulk is smart too, but when I'm scrapbooking I find that I need to be able to print at home, because I always forget at least one really important photo.


Perfection is a major road block for me. When I was younger I scrapbooked every single thing. My scrapbooks were a diary of my daily life in photos. When I didn't have time to keep up with that pace anymore I quit altogether. These days I have made peace with photo albums. I started Project Life because it's more of a hybrid of scrapbooking and photo albums. This works for me, because it's simple and quick but still leaves room for creativity and journaling. 
I think that finding a method that works for you is the most important key to scrapbooking. Emma keeps photo albums, because that's what she's comforable with. I know people who make beautiful digital photo books after every vacation. Amazing? Yeah. Realistic for me? Nope. Find something that works for you
Moral of the story? If you want to do something, don't wait! Just start today. No more excuses.


Here's a little peek at my most recent scrapbook pages. I love scrapbooks that are 90% photos, so that's what I tend to do. Where is your comfort zone with scrapbooking? I'd love to hear your thoughts.

See Reference


Learn more »

Make Your Own Camera Cozy


Today, my pal Kyla Roma is going to share a really fun (and useful!) do-it-yourself camera cozy! Enjoy... One of my favorite things to blog about are every day moments I capture with my husband and friends- but I don't like leaving my cameras rattling loose in my bag, and having a heavy duty camera bag taking over my life is not in my plans! A camera cozy is a quick to make, cute accessory that keeps everything you need close at hand and can swap easily from bag to bag.


Supplies Needed: fabric, pencil, scissors, needle, thread & a sewing machine
1. Choose a fabric for your project. The best type of fabric to choose is something strong and soft, but that won't "shed" and get into your camera. I found a really cute dress at a thrift store that was perfect (because it didn't fit me, and I wasn't going to let someone else snap it up!). If you choose fabric from a vintage or thrift-ed item, cut out the largest section of flat fabric to work from and iron it before you start working. For this dress, I cut out the skirt and made sure I had enough fabric to easily wrap around my camera twice.

2. If you use more than one camera, use the largest one as your guide. Fold the fabric in half, place your camera on top of it (lens facing the fold) and cut around the camera in a semi circle. Make sure you don't cut all the way around- leaving the pieces joined makes sure your cozy is super strong and durable. Make sure to leave extra room on either side of your camera- I cut the fabric into a baguette shape to leave room for extra lenses, but if you cut yours into more of a "V" shape it will work more like a traditional camera case.

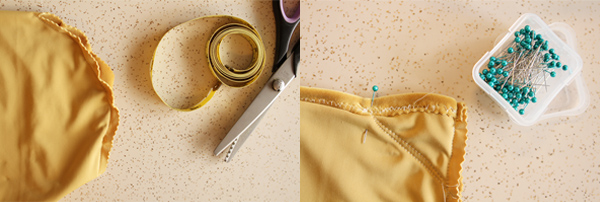
3. Turn your fabric inside out so the "good" sides of the fabric are facing each other. Fold the top edges over and sew a straight edge along it so you have a neat seam. Then sew down along the side of the bag, one at a time (see above, left) joining up the sides of the camera cozy. Once you've sewed these up, you have the basic structure of your bag!
4. If you want to add an extra detail, pin each corner of the bag in two places - one about an inch in from the top corner and one about an inch down from the top corner of the bag. Sew a straight line between these two pins (see above, right) to create a fancier corner.


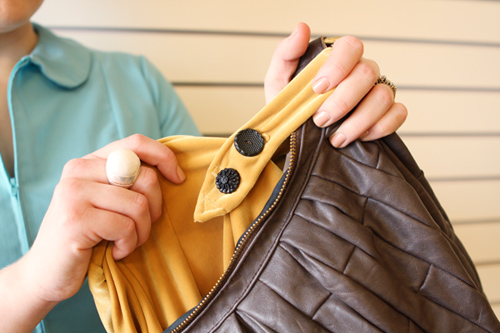
5. Sew on a long, thin piece of fabric as a strap. You can judge the length that's right for you by trying on the bags that you wear the most and seeing where you're comfortable with the cozy hanging in each- make a quick pencil mark at that point and sew across it, or fold the edges inward and sew them into a point. You can add button holes by sewing rectangles and cutting a straight line in the center of them. To line the buttons up to the holes, I placed the strap where I wanted it to line up on the front of the bag, pinned the strap there and sewed my first stitch for each button through the hole to anchor them in the right position. Then you can finish them up normally without worrying.


Slip your camera inside and button the cozy around the strap of your bag to try it out...


Wow!! Its perfectly fit. :)


With your camera cozy in tow you'll be prepared for cute, candid moments whenever they happen. Organizational fashion accessories just make my geeky heart skip a beat.

See Reference
Learn more »

Adventures with Gold Leaf


I've wanted to try gold leafing for a while now too. It's always fun to try something new! After we picked up a gold leafing kit from a local craft shop. I read the instructions (this is key if you're new to something. Even though I am often tempted to skip this step!) and checked out the manufacturers website for any tips.


This is a slightly different application to the Honey Bear vases we created. I wanted to try something that wasn't a full coverage look. Some designs worked better than others, as you can see. Here's what I did and what I learned from it:


1. Supplies: gold leafing kit (this included metal papers, adhesive and sealer), items to embellish (I picked up a mini cake stand and double bowl from TJ Maxx), soft paint brush and sponge.
2. Using your paint brush, add adhesive in the design you choose. Allow to dry until it becomes tacky then lay a thin layer of gold leaf over it. Pat it down with your sponge or your finger. Gold leaf can easily chip or smudge, but don't get frustrated. Have patience.
3. Allow to dry and then gently brush off excess gold leaf with a (clean) soft paint brush or sponge. I tried both and had better luck with the sponge.
4. Apply the sealer over your design and allow to dry.


Tips for first time gold leaf users (like me).
  • Choose a design that will look good messy. Gold leaf is not easy to work with so you will probably have a few chips or smudges when you are done. This can add a lot of charm! If you really want clean edges you might try painting instead.
  • If the gold leaf sticks to your hands too much stop and go wash your hands. There's a good chance you got a little adhesive on your hands, or the oils are sticking to the leaf. Clean, dry hands work best.
  • You can fix holes in your design after by apply a tiny bit more adhesive and adding gold leaf again. So don't despair if your first attempt isn't "perfect."


  • Practice on a damaged or thrift-ed item first. It's best to get a feel for the supplies if you've never used them before. I practiced on a chipped mug I was planning to throw out anyway and this really helped me to see how the gold leafing was going to turn out, so I adjusted my original design idea.
  • For this kind of application designs with small areas work best. For example, the small ridged edge of the bowl above (left side) worked much better as a design idea than the long stripes design (right side).
  • Items will not be dishwasher or food safe. I created items for my bedroom, to hold rings and perfume. You could also make a fancy soap dish or tooth brush holder. But do not plan to create dishes to eat off of or that need to be washed often.


Thanks for letting me share my first gold leafing adventure with you. It's fun to experiment and find out what works best, and what doesn't. Try something new this weekend. 

See Reference
Learn more »

Learn To Add Handwriting To Your Photos


Well, this is the first post from Photoshop series. I'm super excited to share Photoshop techniques with you. For my first tutorial, I decided to tackle one of the biggest reader requests we get. In this article I'll share the easy steps for adding your own handwriting to photos using 
Photoshop Elements, plus my own personal tips.


I use a Wacom Bamboo Connect Pen Tablet to add handwriting to my photos. A few months back I posted about it and many of you asked for additional tips and tricks! There are many different tablets you can purchase to draw in Photoshop  I chose this tablet because it's budget friendly and easy to travel with. I often travel and work outside of the home. I love that I can take this little tablet with me everywhere I go. I honestly use it every single day. 
(NOTE: If you do not have a tablet you can still use your mouse to add handwriting. It may not be as smooth, but for smaller things like a heart or an arrow it will still work using these instructions.)

1. Choose your photo + open it in Adobe Photoshop Elements. When choosing photos to add handwriting to I like to choose photos with some white space. I even take photographs with this white space in mind so that I can add handwriting in Photoshop. 


2. Choose your brush. Next, select the size, opacity and color. I labeled these in the screen shot above. A. Brush tool- There is also a drop down menu at the top where you can choose different brushes (seen below). B. Size- I always try at least two or three sizes after choosing a brush. I try to make my photos look like they were drawn on by pencils or markers, so I keep the sizes very small. C. Opacity- By reducing the opacity of your brush you can make your lines appear darker or see through. I often reduce the opacity when I underline words. D. Color- Choose the color you want to draw with. I normally use black of white, but you can choose any color by clicking on the square.


3. Zoom in and try different brushes. Choose your favorites! You can zoom in by pressing Command and + at the same time. I usually zoom in when writing to get a better view of my handwriting. When you are zoomed in you can see the differences between each brush much more clearly. 


4. Try different colors for your handwriting + drawings. I mentioned this in step two, but let's take a closer look. When you click on the color icon (the black/white squares on the sidebar above) you can choose colors for your drawings. Choice of color is super important. If you choose to branch out from black and white you will want to spend some time experimenting with how the colors look on your photo. 


5. Have fun + experiment! The possibilities are endless! You can also use your tablet as your mouse. Once you become comfortable with it you'll be surprised how often you want to use it. :) 


They are great. Above is an example of a bunch of different brushes from the default menu. Experiment with opacity, size and color to give them the look at feel you want.

See Reference
Learn more »

Light Up Your Bed's Headboard At Home


Today we are teaming up with Valspar and their Love Your hue Guarantee to share our latest supplement to Elsie’s visitor bedroom: a light up headboard! We liked to create certain thing unique and playful for this room in her home. We were motivated by marquee signs and liked to create that feeling but in our own homemade way. We’re not exactly expert craftsmen, so we kept our conceive easy and recruited a little help from our father. Here’s what we did:


First we built a headboard. We wanted a big but simple headboard that could furthermore hide electrical work behind it (for the lights). We utilized six thin planks about the identical extent as the bed. We braced these together with two long 2x4 boards behind, and supplemented a border (using 1x4s) to the top and the two sides.


Next we utilized a projector to find the word onto the bed frame. It was so hard choosing a phrase! Before we set down on “Sleepover” we thought about doing “Good Night” or “Welcome” or “Sweet Dreams.” Since the bed frame is in the guest bedroom we liked certain thing cute and inviting. If you choose to conceive this task, have fun selecting your own phrases for your bed frame. We ended up utilizing a font called Buttermilk.


Next we planned where to add all the holes for the lights to shine through. Keep in mind that you can easily adjust where the holes are as you drill, but try to evenly space them all along your design.


Now drill your holes. Before we started we drilled a few practice holes in a scrap piece of wood so that we could choose the best size of drill bit to use. Once we settled on the size be sure to use care as you work. You do have to drill all the way through the board without drilling into a wall or other work surface.


Once you have drilled all the holes sand and clean off the surface of the headboard. Paint your design. We used Valspar Signature paint in Lincoln Cabin Black.


Once your paint is dry, it’s time to add the lights! We used over 300 Christmas lights in our design. Simply push the lights through each hole and tape in place using electrical tape. You may also need an extension cord at the end depending on how far away your outlet is from your bed frame.


We just love how this headboard project turned out! We can’t wait to have holiday guests over tonight to show off our new guest bedroom decoration. Happy crafting! Elsie and Emma
SAFETY TIPS: We spoke with our local fire department to double check the safety of this project. Be sure to follow these guidelines if you plan to recreate this project:
  • Before purchasing your lights check for a label of an independent testing laboratory (most commercially sold Christmas lights will have this). Some lights are specially made for indoor or outdoor use, be sure to use lights made for indoor use.
  • Replace any string of lights with worn or broken cords, or loose/broken lights. Check the manufacturer's instructions for the number of strands that can be safely connected.
  • Your finished project should not have any exposed bundles of cords or wires, only the final cord or extension cord so it can safely reach an outlet.
  • Just as you would with your house decorations or your Christmas tree, always turn off lights before leaving your home or going to bed.


See Reference
Learn more »

How To Make Paper Flower Pencils


Every spring I obsess of paper flowers. I obsess over real flowers too, but the paper variety tug strongly at my heart because I can actually keep those ones alive! Hooray! I’m always trying to think of fun ways to use them other than just popping them in a vase, and here’s one of them… paper flower pencils! (And pens, too.) These flower-topped pencils would be so fun for signing a party guest book, giving out as favors or just for writing your thank you notes. Grab some crepe paper and let’s get started.


Supplies:

  • Crepe paper (in three colors for the center, petals and greenery)
  • Pencils or pens
  • Floral tape
  • Craft glue
  • Scissors
  • Lollipop stick or skewer (for curling petals)


First cut a 2″ x 1″ strip and a small square of crepe paper for the flower’s center. Cover the pencil’s eraser (or top of the the pen) with the square and secure with floral tape. Fringe one side of your crepe strip and wrap it around the top of the pencil. Secure again with floral tape.


Cut out five smaller petal shapes (about 1.5″ tall) and six larger petal shapes (about 2.5″ tall). For each petal, large and small, stretch the center of the petal to form a “cupping” shape. Then curl the top of the petal under using your lollipop stick or skewer.


Starting with the smaller petals, wrap each around the pencil, rotating the pencil each time so they petals are spread out, and secure all five with floral tape.


Then add your larger petals using the same method. I recommend taping between every one-two petals and looking at your flower to see where you want to place the next petal(s).


Cut a 1″ x 3″ strip of green crepe paper and fold in half and in half until you have a half-inch wide section. Cut one end into a point, forming the flower’s calyx.


Wrap this around the base of your flower and secure with floral tape, this time wrapping all the way down the pencil.


Now we need to cover the tape with crepe paper to finish it up! Cut a long 1″ wide strip of crepe and place a dot of glue just under the calyx.


See Reference
Learn more »